
Perfectly Cooked Steak - Pan Sear / Oven Finish Method (Recipe)
posted on
August 23, 2022

Grass-fed beef is absolutely delicious, packed with nutrition, and -when it comes to steaks - is a fantastic eating experience if you follow one simple rule…
Don’t overcook it!
For most of our steaks, we recommend cooking to medium rare (130-135 degree final temp) and no more than medium (145 degree final temp). At this juncture I would point out that the USDA recommends cooking beef steaks to 145 degrees for food safety, and you have to make your own decision about that.
One of my very best friends loves her steaks well done. I love her anyway and will even acknowledge my association with her in a restaurant. And it is true that industrial overly-fat grain-fed beef can stand up to this torture and still be OK...
But there’s nothing industrial about One Straw beef. Grass-fed and grass-finished means zero grain. Our beef steaks have just the right amount of fat when you treat them a little more gently - and we want you to absolutely love every mouthful.
So, please, if you are a well-done-steak lover, know that we still love you! We just recommend you stick with the tenderloin (filet mignon) or the rib eye.
Many grass-fed steaks are a fantastic eating experience at medium rare and pretty good at medium, but cook them and you’re probably going to be disappointed.
Enter the pan seared cooking method.
Because of the control you have over the cooking process it is perfectly suited to nearly any steak.
( If you've got a tenderloin, rib eye or NY that does fine with higher heat cooking, you might also try this Best Broiled Steaks Recipe).

Before we get into the nitty gritty on the pan seared method, here are a few important tips for cooking steaks (by any cooking method):
Steak Cooking Tips
- Remove from the refrigerator 30-60 minutes before cooking, allowing the steak to approach room temperature. For a 1" thick steak, 30 minutes. For a 2" thick steak, you'll want the full hour. This step is important because with a cold steak it’s harder to reach the appropriate internal temperature without over-browning or drying out the outside.
- When you take the steak out of the fridge, liberally salt it on all sides then place it on a plate or cutting board to rest. The salt will begin to penetrate into the meat as it rests, creating a more complex flavor in the finished product.
- Take the steak out of the oven when the internal temperature is about 5 degrees less than your final target and allow it to finish on the counter, tented with foil, for 5-10 minutes. The purpose is two-fold:
- You absolutely don’t want to overcook your steak! The internal temperature will continue to rise about 5 degrees after you remove it from the heat.
- You don’t want a dried-out steak! Allowing the meat to rest allows the juices to re-absorb into the meat, making for a juicier end result.
- Don’t crowd the pan. You should only cook one or two steaks per pan, depending on the size of your pan and the size of the steaks.
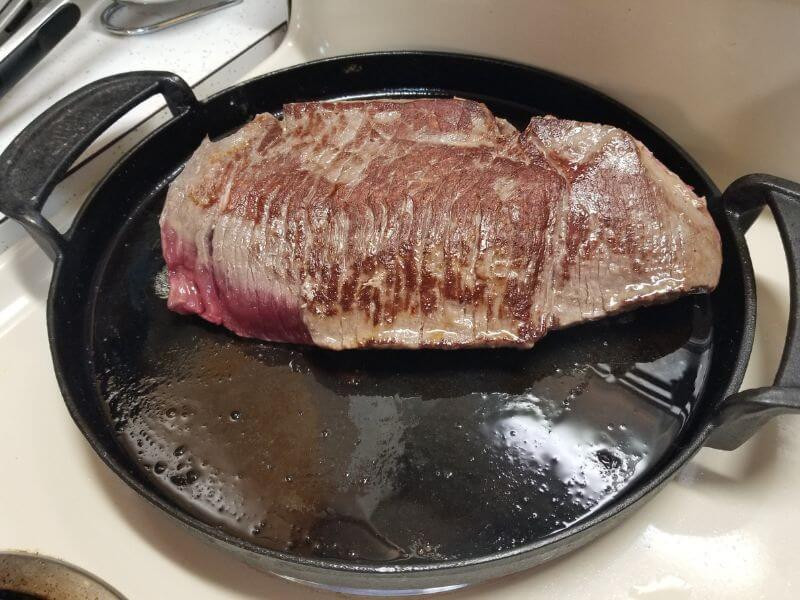
- About cooking steaks to medium/rare - we like a final target internal temperature of about 130-135 degrees. That was the final temperature of the steaks pictured here before we gobbled them up. If that’s your target, remove from the heat at 125-130 degrees. (However, for safety the USDA guidelines state you should cook beef to 145 degrees before removing it from the heat. We think this is too high, but I wanted to tell you so you can make informed decisions.)
- Final oven finishing time will mostly depend on the thickness of the steak. The lower time range is for a 1" steak, which includes most One Straw steaks. Use these lower times for the tenderloin, too, even though it's a 2" steak. The higher range is for a large 2" steak, like the London Broil.
Let’s get started!
Pan Seared / Oven Finished Steak
Ingredients
1-2 One Straw Steaks of choice (Denver, Ribeye, Top Sirloin, NY, London Broil, Tenderloin)
2 T avocado oil (or other high heat oil)
Salt
Pepper
Heavenly Herbed Butter Sauce for garnishing, optional
Method
- 30-60 minutes before cooking, remove thawed steak from refrigerator and take out of package. Liberally salt on all sides and place on a plate or cutting board to rest until cooking time. 30 minutes for a 1" thick steak, 60 minutes for a 2" thick steak.
- Preheat oven to 375 degrees.
- Start preheating a large cast iron or other heavy bottomed pan over medium heat until smoking. This can take a few minutes. Turn on your exhaust fan.
- Pat steaks dry. Rub with 1 T avocado oil.
- To smoking hot pan, add 1 T avocado oil and swirl to coat.
- Carefully place steaks in pan, with space around each one.
- Sear for 1.5 – 2 minutes without touching the steak, until well browned.
- Turn the steak over and sear for 1.5-2 minutes on the second side – resist the urge to fuss with the steak in any way – you just want to let the heat do its thing.
- Leave the steaks in the pan and place in the preheated oven.
- For a 1" thick steak or a tenderloin steak, roast for 2 minutes. For a large 2" thick steak like the London Broil, roast for 8 minutes.
- Remove from the oven, and test the internal temperature with a digital thermometer.
- You are aiming for about 5 degrees less than your final target temperature. I like to remove the meat when it reaches 125 degrees. If it hasn’t reached the desired temperature, place back in the oven for 1-2 more minutes and test again. Don’t walk away and start something else – the steak cooks very rapidly at this point (ask me how I know this).
- When the temperature is 5 degrees less than your final target, remove the pan from the oven.
- Place the steaks on a plate, tent with foil, and allow to rest for 5-10 minutes. Don't skip this step.
- Slice thinly against the grain of the meat and enjoy every delicious bite! Check the grain of your steak to make sure you're slicing against the grain. For the larger London Broil, slicing against the grain will likely mean you're cutting parallel to the long edge. In this case it can be easier to first cut the steak in half, making it into two square pieces, before slicing.
Click here to order grass-fed steaks.


![🎥 Meet the chickens behind your favorite eggs. [video]](https://storage.googleapis.com/grazecart-images-prod/onestrawranch/images/1778018019_69fa66e316f66.jpg)
